
Hi!

Valeriu Paloș

I’m Valeriu — still the kid fascinated by building the world; just with better tools. Lately, some of them are about making math visible and easy to get.

  • Loomiere: a post-mortem of my favorite code
    Loomiere: a post-mortem of my favorite code

    Fifteen years ago I wrote the code I’m still proudest of, for a product category that no longer exists. This is its story, told now that I’ve finally given the repo a dignified closing README instead of letting it rot quietly.

    2010, when video was hard

    If you’re younger than the problem, here’s the world: web video meant Flash players doing progressive download over plain HTTP — and I do mean your own Flash player, because every video site had to write one; there was no HTML5 <video> coming to your help. Seeking worked by asking the server for the file from an offset (?start=). There was no HLS, no DASH, no adaptive bitrate; CDNs existed but were priced for companies with sales departments.

    If you ran a video site, bandwidth was your business model — every wasted byte was money, and every rebuffer was a lost viewer.

    I ran into this the honest way. My company operated peteava.ro, a Romanian video-sharing site (now defunct, like most of that era), and I had already written one streamer for it — psstream, a PHP extension from 2008. It did the job until it didn’t: none of our servers could hold more than about 150 simultaneous streams without the machine practically freezing.

    That wall is where Loomiere begins.

    First pass: the micro-streamers

    The first Loomiere (0.x) was an exercise in minimalism: a set of tiny micro-streamers — one per format — written in C against dietlibc, statically linked, the MP4 streamer weighing about 21 KB on disk and 120 KB in memory, spawned one-process-per-request under ipsvd/runit.

    It entered production on all of peteava’s streaming servers on Friday, January 29, 2010, at 14:31 (some moments you write down). The same day, a random check on the most strained server showed 653 simultaneous clients where the old streamer had managed 150 — and total bandwidth had dropped by roughly a third, because of the throttle I’ll get to in a moment.

    Two months thinking, two weeks writing

    The 0.x design had a ceiling — one process per connection is honest but profligate — so I rebuilt it. I spent about two months just thinking about Loomiere 2.0’s internals before writing it, and then wrote the whole thing in about two weeks.

    Think long, write short — not always possible, but I’ve been trying to work like that ever since; the thinking is the work, the typing is transcription.

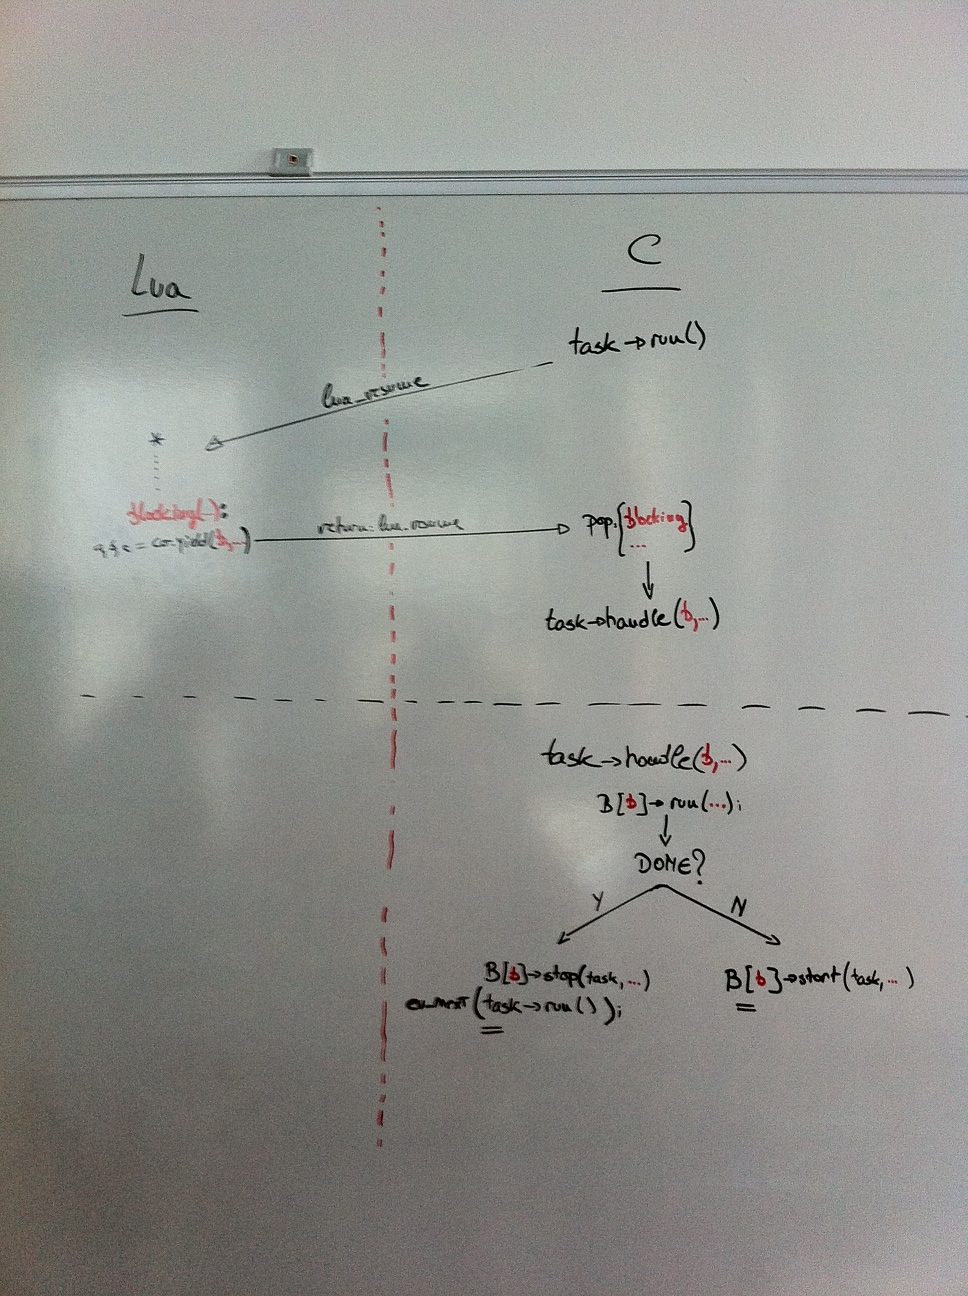
    What I remember from those two months isn’t code at all: it’s the old whiteboard, so full of sketches that at some point I was defending it with my own body from the cleaning lady’s sponge. Improbably, a photo of it survives — the exact spot where the Lua and C universes cross inside the code, coroutines yielding on one side of the line, the event loop deciding on the other:

    What came out: a C core on libev with SMP worker threads (“the hardware should be the only limit”), an in-memory cache, and — the part I’d still defend in any design review — Lua as the configuration and scripting surface. Virtual hosts, URL routing, rewrite logic: all Lua, so wiring Loomiere into an existing site was an afternoon, not a migration.

    And that whiteboard sketch is exactly the machinery being born: each stream lived as a Lua coroutine — a blocking operation yielded it across the line to the C event loop and resumed it on readiness — with spinlocks at the few seams where worker threads had to touch. Thousands of streams juggled in parallel on one machine, in 2010, when Node.js was a year-old curiosity and the async-everything movement it would ignite hadn’t happened yet. It was, and I say this with the full bias of authorship, truly beautiful.

    The throttle (the part worth stealing)

    The economics lived in one mechanism: the VBR-aware bandwidth-conservation throttle. Serve at full speed only until the client holds N seconds of playback ahead of the play-head (default: 20), then pace delivery to the stream’s own bitrate. The subtlety is “seconds”: with variable-bitrate video a byte target is wrong at exactly the moments that matter, so the buffer was tracked in playback time, not bytes. Smooth playback, instant seeks, and — since most viewers don’t finish most videos — dramatically less bandwidth bought for content nobody watched.

    On day one it cut peteava’s streaming bandwidth from roughly 1300 to 900 megabits while serving more clients.

    The numbers

    The run I still grin about was a single SSD-based machine in January 2011 — a 3 GHz Core i7, 12 GB RAM, six 256 GB SSDs, three gigabit NICs:

    6500+ active concurrent streams, 2841 Mbps of traffic, with the SSDs under 20% load.

    Cacti graph from January 2011: 2771.71 Mbps effective bandwidth
    2771.71 Mbps effective bandwidth — the original Cacti capture.
    Monitoring graph from January 2011: 6500+ active concurrent streams
    6500+ active concurrent streams on one machine.

    At that point we hit a wall that wasn’t Loomiere: somewhere between the I/O path and the sockets — interrupts, kernel, mainboard — the CPU saturated while memory and disks idled. \

    My note from that night reads, in its entirety: “Hmm… this is a deep one.” I never did get to the bottom of it; the wall was comfortably above what any single machine needed to do.

    CPU activity graph showing saturation while memory and disks idled
    The wall: CPU saturating while everything else idled. “Hmm… this is a deep one.”

    In steady production the fleet told the real story: Loomiere 2.0 served all of peteava.ro’s video — about 800 TB every month, from 14 servers — and did so for over five years in total.

    And none of it ran in a cloud, because there was no cloud worth the name: every one of those servers was physical iron that someone had to rack, cable, and keep alive (shout-out to Bogdan, who has since turned that craft into his own hosting business).

    Even the best things end

    Loomiere stood on libev, whose documentation contains a section titled — beautifully — “ev_cleanup — even the best things end”. Somewhere in those docs (I’ve never managed to find the exact passage again, but never managed to forget it either) its author left a thought along these lines: you always have the API to kill whatever needs killing — but there is something about a program written so well that, at end-time, all its threads close gracefully on their own… something close to perfect.

    Loomiere delivered on that spectacularly: at one point it ran for three years without a restart — no leaks, and no creeping memory fragmentation either, which at that kind of uptime stops being an implementation detail and becomes a discipline.

    And when asked to stop, it stopped the way the docs dreamed: every watcher, every worker, every connection closing in order, all the way down.

    And the child in me will forever cherish that.

    What happened

    The category was absorbed, the way categories are. nginx shipped its mp4/flv modules and pseudo-streaming became a config flag on a server everyone already ran. Then adaptive streaming (HLS, DASH) and CDNs finished the job. Loomiere’s last release was December 2011 — right about when the ground finished moving.

    Could I revive it? No. The industry has advanced enormously and I’d be fighting monsters — nginx, CDNs, twenty years of protocol evolution — over territory nobody disputes anymore. Reviving it would honor the code less than closing it well does.

    What it left behind

    Three things survived the product, all of them still in use:

    The method: think long, write short. Not always possible — but I’ve been trying ever since, and Krbn, the pencil-rendering engine I released recently, was built exactly that way, fifteen years later.

    The taste: performance as a design property, not an optimization pass; the conviction that software’s job is to get out of the hardware’s way.

    And the lesson I’d offer anyone building infrastructure products: a product built on a protocol era ends with the era. Platforms absorb categories. If your product is a feature of the platform’s future self, your moat is time — spend it accordingly.

    The repo is preserved at github.com/vpalos/loomiere, readable and honest about what it is. Start with options.lua — the whole design philosophy fits in its comments.

    Rest well, old friend. You were fast.

  • Genesis imperfecta (or: I finally built the pencil)
    Genesis imperfecta (or: I finally built the pencil)

    This is not a scan of a pencil drawing. It’s SVG — computed, deterministic, and, in a sense I’ll get to, exact.

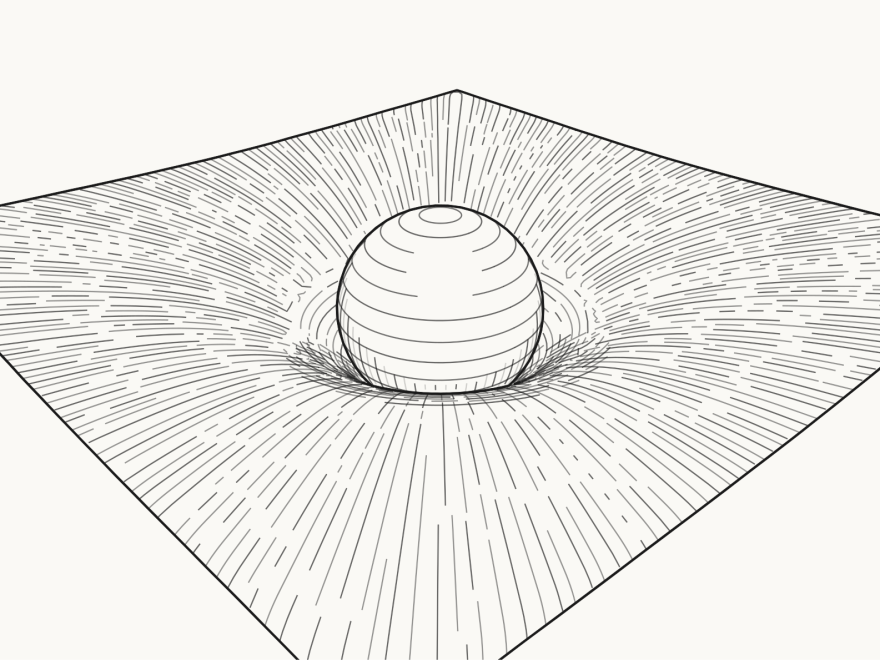
    A sphere resting in a gravity well, the sheet's hatching flowing into the dent

    For the past few months I’ve been building Krbn, a small open-source rendering engine that draws 3D scenes the way a technical sketch artist would. It’s a childhood idea. Back then I wanted to call it genesis imperfecta, because what fascinated me was — and still is — the idea of going against photorealism: that a human being conveys more meaning in a drawing than any photorealistic render, precisely by renouncing detail, dropping precision, deliberately introducing imperfections. The catch, of course, is the question hiding inside that sentence: which detail do you drop? Which imperfections do you introduce? That question turns out to be an engineering problem, and a lovely one.

    The inversion

    Most rendering answers “what color is this pixel?” A pencil drawing answers “which lines would an artist draw — and which would they leave out?” So Krbn has no shading model. It derives strokes from geometry and then applies policies to the stroke set:

    • Silhouettes of spheres, cylinders, cones are computed in closed form — they are exact conics; a torus yields its true quartic. No sampling, no meshes pretending to be curves.
    • Hidden lines aren’t z-buffered away; each contour is split analytically into visible and ghosted runs, the way a draftsman keeps the far edge of a box faintly alive.
    • There is no alpha channel. Cross-hatching is inherently see-through — the gaps between strokes reveal what’s behind, exactly like on paper. And the hatching follows each surface’s own curvature field, so form comes from direction, not gradients.
    Two trefoil knots, one hatched along its curvature field, one hatched flat

    Exactness was a deliberate value, not an optimization: intersections are roots of low-degree polynomials, and the degenerate cases — tangent lines, coincident conics, grazing cusps — are treated as the spec, not as edge cases. The reward is output you can trust: the same scene always emits the same, byte-identical, diffable SVG.

    The part stills can’t show

    Hand-drawn wobble is easy. Hand-drawn wobble that survives animation is not: re-randomize per frame and the whole drawing “boils.” In Krbn the wobble is seeded on stable stroke identity — each line carries its jitter with it across frames — so an orbiting camera slides the silhouettes while the lines stay calm:

    A camera orbit of a mixed scene — the hand-drawn lines stay calm, no boiling

    Getting to that calm — persistent stroke identity, hatch that pans with surfaces instead of re-dealing, detail that fades instead of popping — was the hardest part of the project, and my favorite.

    The other experiment

    I’ll say this plainly, because I put it in the README too: Krbn was built with heavy AI assistance, unapologetically. It doubled as an experiment — how far can a carefully directed human–AI collaboration get on a hard rendering problem? “Carefully directed” is the operative phrase: the architecture, the taste, and the standards are mine, written down and enforced (the working brief and the numerical-robustness rules ship in the repo — judge for yourself). The code was reviewed and tested like any other code. The answer to the experiment, as far as I’m concerned: far. Farther than I expected.

    What’s next

    Nothing on a schedule — this is a break-time project and I intend to keep it joyful. But the ideas corner is already growing (stippling as an alternate hatch strategy, colored pencils that stay stroke color and never become a fill model, deliberate temporal decoherence à la “Take on Me”), and the repo has an example gallery plus open Discussions.

    If you make technical figures, drive a pen plotter, or just share the fascination — come say hello. Or don’t; all is good. The pencil exists now, and twelve-year-old me is satisfied.

  • Creating Primary Keys in TimescaleDB with TypeORM

    Using TypeORM1 with TimescaleDB2 hypertables requires some additional work besides the usual operations needed to use a PostgreSQL data source.

    This is because:

    • TypeORM requires that each entity has a primary key (in Timescale this is quite optional);
    • Timescale requies the primary key to contain the partition key (usually the time range column).

    To make this work, you can do the following:

    • Add an auto-generated ID column to the hyper-table;
    • Create a composite primary key on both the ID as well as the hypertable’s partition key.

    This will satisfiy both TypeORM’s need to have a unique primary key across the whole table, as well as Timescale’s requirement that the primary key contains the table’s partition key.

    Example

    In Ping.ts (entity definition file):

    @Entity('pings')
    export class Ping {
        @PrimaryGeneratedColumn()
        id!: number;
    
        @CreateDateColumn({ primary: true })
        startedAt: Date = new Date();
    
        // ...other columns...
    }

    In the TypeORM migration file:

    // Make sure the primary key contains all needed columns.
    await queryRunner.query(`CREATE TABLE "pings" ("id" SERIAL NOT NULL, "started_at" TIMESTAMP NOT NULL DEFAULT now(), ...other columns..., CONSTRAINT "PK_005b7a421c5dcdf04f030f2ab92" PRIMARY KEY ("id", "started_at"))`);
    
    // Create hypertable.
    await queryRunner.query(`SELECT create_hypertable('pings', by_range('started_at'));`)

    P.S. In case you’re wondering why the SQL code uses snake_case while the TypeScript code uses camelCase, this is achieved using the typeorm-naming-strategies package.

    1. This article presumes you are familiar with the TypeORM package. ↩︎
    2. This article presumes you are familiar with the Timescale extension for the PostgreSQL DB. ↩︎
  • Framework-agnostic, ad-hoc image cropper

    Framework-agnostic, ad-hoc image cropper

    Today, I’m releasing a framework-agnostic, in-browser image cropper. The motivation is that I need this on a regular basis in multiple projects, across multiple frameworks and – while I’m aware of existing tools like Cropper.js and others – quite frankly, to me they seem too complex to setup especially depending on the front-end framework I’m dealing with. I needed this problem reduced to a simple JS call.

    (more…)
  • Dynamic session cookie name in Laravel

    Here’s a case that may be useful when authenticating multiple apps from a single Laravel code-base.

    Recently I’ve built an application API and admin UI in the same Laravel code-base. This made lots of things easier to manage, including DB-related stuff. The API is consumed by a single-page app (ReactJS) and the backend is built with Laravel Orchid.

    Also, it’s worth noting that the API is using Laravel Sanctum to provide session-based authentication to the front-end application.

    The problem

    Because both the front-end app (ReactJS+API) as well as the admin interface (Orchid) are using session-based authentication, and both are served from the same Laravel code-base, the session cookie name is the same in both cases, which means that sessions created in one app are automatically read by the other, which will obviously fail, because the apps have entirely different user accounts.

    Trying to solve this thing proved to be more difficult than I thought, since Laravel is built from the ground up to use the configured session cookie name (i.e. session.cookie defined in config/session.php).

    What makes things worse is that Laravel creates the session on the handled request before any middleware gets executed, and the created session already has the initially configured name set.

    The solution

    After several hours of trials, here’s what worked, in short:

    • Created a middleware called session.tenant that takes a string parameter (a tenant name).
    • In this middleware, I set the value of the config setting session.cookie but also the run-time session name (i.e. Session::setName()).
    • In Kernel.php I prepended the session.tenant:admin middleware to the admin UI routes (basically the web group) and the session.teant:api to the API routes (the api group).

    It might not be the most elegant approach, but these changes proved to work very well with minimal code and without touching any of Laravel’s internals. Checkout the code below for details.

    app/Http/Middleware/SessionTenant.php

    <?php
    
    namespace App\Http\Middleware;
    
    use Closure;
    use Illuminate\Http\Request;
    use Illuminate\Support\Facades\Config;
    use Illuminate\Support\Facades\Session;
    
    class SessionTenant
    {
        /**
         * Handle an incoming request.
         *
         * @param  \Illuminate\Http\Request  $request
         * @param  \Closure  $next
         * @return mixed
         */
        public function handle(Request $request, Closure $next, string $tenant)
        {
            $original = Session::getName();
            $modified = "{$original}_{$tenant}";
    
            Session::setName($modified);
            Config::set('session.cookie', $modified);
    
            return $next($request);
        }
    }

    app/Http/Kernel.php

    I’m only showing the relevant additions to the Kernel.php file, the rest is just the usual Laravel code.

    # ...
    
    protected $middlewareGroups = [
        'web' => [
            'session.tenant:platform',
            # ...
        ],
        'api' => [
            'session.tenant:api',
            # ...
        ],
    ];
    
    # ...
    
    protected $routeMiddleware = [
        # ...
        'session.tenant' => \App\Http\Middleware\SessionTenant::class,
    ];
    
    public function __construct(Application $app, Router $router)
    {
        parent::__construct($app, $router);
        $this->prependToMiddlewarePriority(\App\Http\Middleware\SessionTenant::class);
    }

    Note also the call to $this->prependToMiddlewarePriority(...) in the constructor (at the end). This pushes the middleware at the start of the processing chain so the session name is changed as soon as possible.

    Hope it helps, enjoy!

  • Dynamic custom data via OAuth with Laravel Socialite

    If you’ve ever done authentication in a Laravel-based project then you probably had to deal with the Socialite extension, which enables OAuth-based authentication using third-party services (like Google or Facebook).

    Passing dynamic data to the external OAuth system and getting that data back to your application, using Socialite, is something neither easily done nor well documented and given that I’ve seen a lot of people wasting time on this, I want to try and shed some light on it here.

    (more…)
  • Remember last value in React functional components


    Sometimes it can be very useful to save previous values of props (or state) in a React component.
    Perhaps this is easier to be imagined in a class component, but in a functional component, less so.

    However, we can use the useRef() React hook to achieve that quite efficiently.

    Less talk, more code (typescript)…

    const someFunctionalComponent = (p: {index: number}) => {
      // Keep the last positive value around.
      const lastPositiveIndexRef = React.useRef<number>(Math.max(p.index, 0));
      if (p.index >= 0) {
        lastPositiveIndexRef.current = p.index;
      }
    
      // Here, the ref will always have the last positive input.
      const positiveIndex = p.index >= 0 ? p.index : lastPositiveIndexRef.current;
      return <span>I'm only allowing positive numbers to be shown: {positiveIndex}</span>
    }

    Here’s a working sample (JSFiddle).

    I found the following comment from the React documentation, quite illuminating:
    However, useRef() is useful for more than the ref attribute. It’s handy for keeping any mutable value around similar to how you’d use instance fields in classes.

    Enjoy!

  • Using enum values as strictly typed object keys


    In TypeScript, it’s often useful to define interfaces or complex (structured)
    types whose properties (or keys) may only be values of a previously defined
    enum type.

    Here’s a good example: an object declaring a set of buttons for a modal dialog.

    Instead of this…

    type DialogButtons = {
      yes?: boolean,
      no?: boolean,
      cancel?: boolean
    }
    
    interface IDialog {
      buttons: DialogButtons
    }
    
    const dialog: IDialog = {
      buttons: {
        yes: true,
        no: false
      }
    }
    
    console.log("yes" in dialog.buttons) // true
    console.log(dialog.buttons.yes) // true
    
    console.log("no" in dialog.buttons) // true
    console.log(dialog.buttons.no) // false
    
    console.log("cancel" in dialog.buttons) // false
    console.log(dialog.buttons.cancel) // undefined

    This works, but once we try to use these values in other contexts, the approach becomes difficult to use. What if we want to pass which button was pressed to a callback function?

    It would be cumbersome. Therefore…

    …we can use enum values.

    enum DialogButton {
      YES = "yes",
      NO = "no",
      CANCEL = "cancel"
    }
    
    interface IDialog {
      buttons: { [B in DialogButton]?: boolean },
      callback: (button: DialogButton) => void
    }
    
    const dialog: IDialog = {
      buttons: {
        [DialogButton.YES]: true,
        [DialogButton.NO]: false
      },
      callback(button) {
        console.log(button)
      }
    }
    
    console.log(DialogButton.YES in dialog.buttons) // true
    console.log(DialogButton.NO in dialog.buttons) // true
    console.log(DialogButton.CANCEL in dialog.buttons) // false
    
    console.log(dialog.buttons[DialogButton.YES]) // true
    console.log(dialog.buttons[DialogButton.NO]) // false
    console.log(dialog.buttons[DialogButton.CANCEL]) // undefined
    
    dialog.callback(DialogButton.YES) // yes
    dialog.callback(DialogButton.NO) // no
    dialog.callback(DialogButton.CANCEL) // cancel

    This uses the a TypeScript feature called Mapped Types
    and allows us to play around with the actual button values with a lot more flexibility, for example we could
    define an array of buttons.

    function renderButtons(buttons: [DialogButton]): [HTMLElement] {
      // ...
    }

    Code gist: https://gist.github.com/vpalos/0aab903ef607d6da31229b957d91d888.

    Enjoy!

  • A CloudFormation recipe for scheduling Lambda functions with 1-minute frequency


    Among the plethora of tools which Amazon has given us there’s AWS CloudFormation. IMO, this proves that AWS is (still) in a class of it’s own. It’s the embodiment of the “infrastructure as code” concept. And, it’s battle-tested, it works! So well, in fact, that they ElasticBeanstalk right on-top of it.

    Automation not supported

    However, once you gain some experience with this beast, you start realizing that it also has faults. In fact, they tend to pile up; that’s one reason we now have some promissing tools like Terraform to play with. One such issue is the fact that CloudFormation doesn’t support the creation of scheduled (recurring) Lambda functions. And that’s a big problem, because you’re forced to do it by hand, by creating a scheduled event source using the AWS CLI, APIs or the Web Console.

    Striving for 1-minute rate

    Moreover, even if you do schedule a Lambda function by hand, the fastest rate at which you can invoke it is 5 minutes, no less.

    Recently, I needed an automatically created Lambda function to be periodically invoked at 1-minute intervals. No more, no less. And, eventually, I found a way.

    Strategy

    The trick is to use a custom metric called Tick (published by our lambda) which can be either 0(zero) or 1(one). We set two CloudWatch alarms which trigger on each state, respectively: TickState0 triggers when Tick == 0 for 1+ minutes and TickState1 triggers when Tick == 1 for 1+ minutes.

    {
      "TickState0": {
        "Type": "AWS::CloudWatch::Alarm",
        "Properties": {
          "AlarmName": "TickState0",
          "Namespace": "Tick",
          "MetricName": "Tick",
          "Statistic": "Average",
          "EvaluationPeriods": 1,
          "Period": 60,
          "Threshold": 0,
          "ComparisonOperator": "LessThanOrEqualToThreshold",
          "AlarmActions": [{ "Ref": "TickTopic" }]
        }
      },
    
      "TickState1": {
        "Type": "AWS::CloudWatch::Alarm",
        "Properties": {
          "AlarmName": "TickState1",
          "Namespace": "Tick",
          "MetricName": "Tick",
          "Statistic": "Average",
          "EvaluationPeriods": 1,
          "Period": 60,
          "Threshold": 1,
          "ComparisonOperator": "GreaterThanOrEqualToThreshold",
          "AlarmActions": [{ "Ref": "TickTopic" }]
        }
      }
    }

    Each Alarm triggers the Lambda (via an SNS topic) and the Lambda toggles the Tick metric (which will trigger the opposite alarm after ~1 minute).

    # Get message body(stack update or alarm).
    message = json.loads(event['Records'][0]['Sns']['message'])
    
    # Detect source event.
    source = message.get('RequestType', 'Alarm')
    
    # Confirm stack deletion.
    if source == 'Delete':
      return send(message, context, SUCCESS)
    
    # Set / toggle state.
    if source == 'Alarm':
      state = int(not float(message['Trigger']['threshold']))
    else :
      state = 0
    
    # Set metric to state.
    cw = boto3.client('cloudwatch')
    cw.put_metric_data(
      Namespace = 'Tick',
      MetricData = [{
        'MetricName': 'Tick',
        'Value': state
      }]
    )

    What’s left is to use a CF custom resource to ensure the Lambda is called on stack operations (create/update/delete) so the whole setup is self-managed.

    {
      "StartTick": {
        "Type": "Custom::StartTick",
        "DependsOn": ["TickState0", "TickState1"],
        "Properties": {
          "ServiceToken": { "Ref": "TickTopic" }
        }
      }
    }

    Test Drive!

    • Clone the code (see below) and use it to launch a CF stack. You’ll have to upload the lambda function (the tick.zip file) on S3 somewhere (and update it’s URI in the CF JSON file).
    • After it started, you should observe in the CloudWatch -> Logs section that a log message is published every minute by the Lambda function (see screenshot below).

    Some considerations

    • Please note that the actual Lambda has additional code and is prepared to be invoked by either the CloudWatch Alarms or the custom resource events (i.e. stack updates).
    • Expecting a shorter trigger period using this method is not realistic, since AWS CloudWatch will always aggregate metrics inside a 1-minute time period.
    • In practice, however, you will observe that this actually tends to be triggered faster than on 1-minute intervals; this is influenced by the different check-times of each CloudWatch alarm (check times differ).

    See complete code on GitHub

    That’s it, enjoy! 🙂

  • Fully dynamic JSON handling in Scala

    For some time now I (badly) wanted to be able to work with JSON structures in Scala just as easily as in JavaScript (though even in JS you need some wizardry to be able to to this elegantly).

    I don’t particularly like Json4s since I feel that it’s overly complex (no, I don’t want to extract data into case classes using for-combinators), documentation is difficult to grasp and use (especially for edge cases) and Jackson and various other libraries are mainly oriented towards the Java-style JSON handling which basically means mapping to/from POJOs or similar.

    What I wanted was to be able to navigate and/or alter a JSON structure directly using simple dot/call notations (e.g. json.server.hosts(2).name = "storage.mysite.com") and have a cheat-sheet-like documentation which whould (always) be simple and sufficient.

    So here is my first swing at this using pure Scala parser combinators and other Scala-specific magic like Dynamics. The only dependencies (beside the Scala library) are the Scala parser combinators and Apache commons lang (I need this for string-escaping, especially Unicode stuff). License is Apache 2.0.

    Disclaimer: This library is a first serious attempt at this problem and thus it is not optimized for high parsing speed, or low memory footprint; it does, however, deliver on ease of working with the JSON structure, which is the main goal. A second release is in the works which tries to optimize for better parsing speed and lower memory consumption.

    Furthermore, I had no time yet to write a complete reference (i.e. the mentioned cheat-sheet), however the 120+ unit tests should be enough to get you going for now.

    Check-out the sources here!

    Compiling

    Normally you would just copy the com/vpalos/Json.scala file inside your source tree and ensure you bring the dependencies in your project (i.e. see build.gradle), but if you want to build a Jar or run the tests just do this (you should be connected to the Internet for all tests to pass):

    git clone "https://github.com/vpalos/com.vpalos.Json.git"
    cd "com.vpalos.Json"
    ./gradlew test
    # ...or...
    ./gradlew build
    

    Teaser

    Please visit the unit tests for a more complete overview! However, here are thre one-liners that should make you interested:

    """{"fox": {"quick": true, "purple": false}}""".toJson.fox.quick.asBoolean // true
    
    """{"points": [12.3, 991.8, 4.009, 1]}""".toJson.points(-2) // 4.009
    
    Json.parse("{}").some.missing.field.isDefined // false, no exceptions thrown
    

    Enjoy!